Sunday, December 13, 2009

Motor Mount Fabrication


Sadly, I don't have a plasma cutter. So fabricating my motor mount was done using an angle cutter, 4 or 5 cutting wheels and a grinding wheel. I went down to Escondido Metal supply and sorted through their scrap section. I found some 6" X 6"x 3/16" square pipe. I had them cut me a 9.25" length. Their scrap was a treasure to me :-) .
Sunday, December 6, 2009

Motor Mount Design


Here's the layout I'm planning on using on my motor mount. It will bolt to the front surface of the motor.
So as I see it. The motor mount I have would have worked if the bolt pattern
would have been like this.
o......o like this

o......o
But after mounting the motor to the transmission, my pattern is like this:
.......o

o...........o

.......o
SO I need a wider mount to accommodate the 45 degree shift in the bolt pattern.
Since the transmission adapter plate has only four attachment bolts, trying to rotate it (to adjust the motor bolt pattern) yields a 90 degree rotation. NO GOOD.
Of course we could drill new holes in the motor. However, I really do not want to do that.
The saga continues...

Thursday, December 3, 2009

SETBACK!


One of the cabinets in my garage decided to fall off the wall after hanging there for the last 10 years. Unfortunately my car was underneath it.
The back panel of the cabinet stayed attached to the wall with the lag bolts I had used 10 year prior. Sadly I now have a few dents to fix. I can't even bring myself to work on the car right now.
Luckily there was no major damage.

Saturday, November 28, 2009

weight reduction estimates


I couldn't make a table with columns using the blog text editor. So I took a picture of my laptop screen. (using apple key,shift,3)
I am estimating my final Vehicle weight to be under 2000 lbs. This is including batteries!

Thursday, November 26, 2009


Some of my posts are a little out of order.  Here's a few shots of the car with my first time, self done paint job.  It's not perfect but I needed to save money for batteries.  The roller is almost finished.
I am still messing around with the 12V system


Sean and I did a trial run on mating the transmission to the motor and installing the monster in the car.
Here the motor ring is attached to the motor.  The adaptor plate and Hub assembly are sitting on the cart.  Next the adaptor plate and hub are installed.  Getting the hub to rest in the correct spot so the flywheel spacing was correct was a challenge.  Next installed the throw out bearing and shift fork with new plastic bushings to the tranny.  Here flywheel clutch and pressure plate are mounted to the motor. Finally, we mated the motor with flywheel, clutch, and pressure plate to the transmission.

Unfortunately the motor mount (which was for an Advanced DC 9" motor) did not work for the AC motor I am using from High Performance Golf cars.  The bolt holes did not line up.
It was a trial run but I was a little disappointed.

Lightened flywheel


Finally got the lightened flywheel (less starter gears) back from the machine shop.
Electro Automotive talks about a magic number when installing the flywheel. This is the distance from the adaptor plate to the front of the Flywheel (see black & white picture). When you machine off the starter gear teeth and lighten the flywheel this number of course changes. Duh.
Luckily I still had a stock flywheel to compare my lightened one to. Just adjust for the difference in thickness.

Monday, November 9, 2009

Engine lid quick disconnect

I got this idea from Sean Molloy a local San Diego Porsche mechanic and racer.
Create a slot where the oval hole on the engine lid hinge is. (See pic.)
This allows you to remove the engine lid quickly.
I'd rather store the lid on the car than take up more space in my garage.


Get longer bolts for the brackets on the firewall that attach to the engine lid hinges. Attach the bolt in the reverse direction. Use a washer and a wing nut to attach the hinge to the bracket. (See pic.) Now you can insert and remove the engine lid relatively quickly.

Thursday, October 29, 2009


My transmission is finished at last!
Thank you Sean Molloy.
My Lightened flywheel with starter teeth machined off should be ready by tomorrow.

Tuesday, October 27, 2009

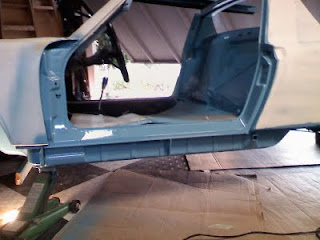
painting and repair pics


This was a bad rust spot that required the skills of master welder Sean Molloy.


Restoring a 35 year old car is not for the faint of heart. Today after being more of an observer than a participator, I decided to start posting my progress in converting a Porsche 914 to an electric vehicle. Tim, Ross and Peter thanks for sharing your knowledge, trials and tribulations.


For the last year most of my work has involved more restoration than EV conversion. My goal with the restoration has been to make the car as light and efficient as possible. To achieve that goal, I have done and will do the following:

1. Use fiberglass front and rear bumpers.

2. Use fiberglass front and rear hoods and fiberglass running boards.

3. remove the headlight motors that raise and lower the headlights and replace with an air shock system. My inspiration for this came from this post (Porsche 914-6 GT Mechanical Headlight Raisers).

4 strip the interior to the bare minimum.

5. remove the windshield wiper motor and replace with a hand crank of my design. (no electricity wasted here)

6. Use air shox (that's how Camp914 spells it) for the front and rear hoods instead of the hood springs used on the 914.

7. Use Lithium Iron Phosphate batteries in the conversion 36 200amphr batteries. (476 lbs)

8. Go with a light flywheel. (It's currently with the machinist.)

9. Use an AC Electric Motor by High Performance Golf cars. 52 HP Max.

To minimize rolling resistance, I have had all the wheel bearings replaced.
I have had the bushings all replaced.
I added an adjustable proportional valve (JWest Engineering) to the brake system and had the brake calipers all rebuilt.
I also added a new fuse box with blade fuses (JWest engineering).

I also did some rust repair and body work plus I painted the car myself to save money for my batteries (the big expense).
I know I'm a bit light on the details, but I will post pictures at a later date.